C#Bot Custom Timeline Events
Scenario
Entity Model
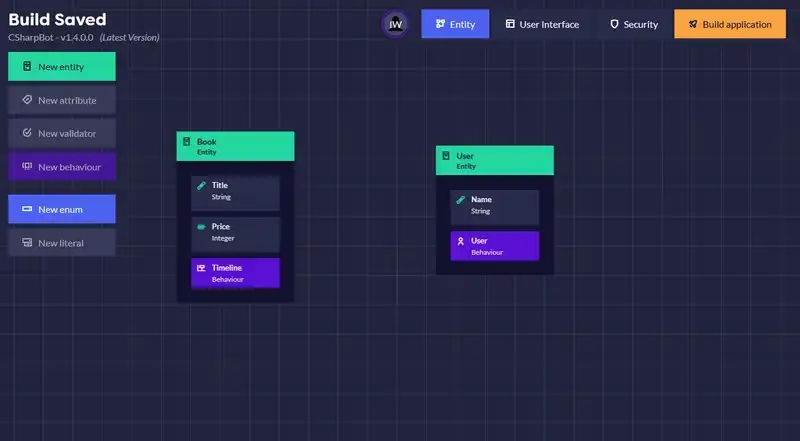
The model used for this example contains only 2 entities:
- Book - A model of a book with a
Timelinebehaviour. - Staff - A user type with a
Userbehaviour.

Interface Model
No Interface modeling is required for this example.
Security Model
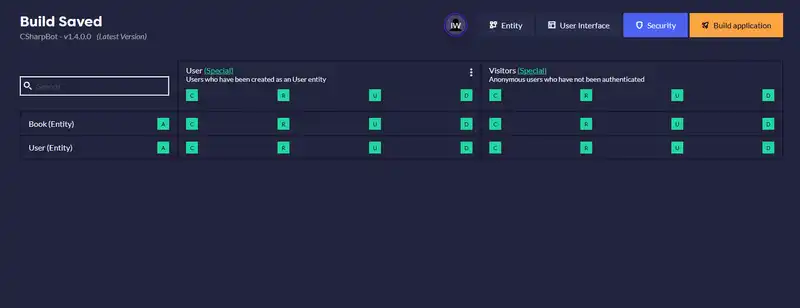
Staff should be given full CRUD control over the Book entity. As well as backend admin privileges in order to access the Timelines Admin Page.

Server-side: Logging Timeline Events
Custom Timeline Events can be constructed in Serverside model for the desired entity. Using our example, open the file BookEntity.cs from the directory /serverside/src/Models/BookEntity.
You will find a Method in the file called CreateTimelineEventsAsync, which will look similar to the code shown below:
// % protected region % [Override CreateTimelineEventsAsync method here] off begin
        public async Task CreateTimelineEventsAsync<TEntity>(
            TEntity original,
            TimelinesharpDBContext dbContext,
            IServiceProvider serviceProvider,
            CancellationToken cancellationToken = default)
            where TEntity : IOwnerAbstractModel
        // % protected region % [Override CreateTimelineEventsAsync method here] end
        {
            // % protected region % [Override CreateTimelineEventsAsync type check here] off begin
            if (!(original is BookEntity originalEntity))
            {
                return;
            }
            // % protected region % [Override CreateTimelineEventsAsync type check here] end

            var timelineEvents = new List<ITimelineEventEntity>();

            .
            .
            .

            // % protected region % [Add any further timeline update events here] off begin
            // % protected region % [Add any further timeline update events here] end

            // % protected region % [Override CreateTimelineEventsAsync database call here] off begin
            await dbContext.AddRangeAsync(timelineEvents, cancellationToken);
            // % protected region % [Override CreateTimelineEventsAsync database call here] end
        }
This method CreateTimelineEventsAsync contains all the default Timeline Event logging logic. It is called when the server updates an entity with a Timeline behaviour. The unchanged version of this passed in as the parameter original, and the updated version of the entity can be accessed through this (thought we can ommit the this keyword and call the properties directly), since the method is on an instance of the updated entity.
The List<ITimelineEventEntity>() named timelinesEvents contains all the timeline events to be logged during this method call. If we want to add a new custom Timeline Event, all we need to do is add it to the timelineEvents list.
Turn on the following protected region:
// % protected region % [Add any further timeline update events here] off begin
 // % protected region % [Override GetDistinctCreatedMonths here] end
For this example, we will make a custom Price Changed events, for when the price has been changed on a Book.
For this method to work, we need to check if the Price property has been updated. Then we call the AddEvent<T> extension method on the timelineEvents list. AddEvent<T> takes 4 paramters:
- Action - A shorthand name for the action being performed.
- Action Title - A longhand name for the action being performed.
- Description - A description of the event that has taken place.
- EntityId - The Id of the entity the event belongs to.
An implementation is shown below:
// % protected region % [Add any further timeline update events here] on begin
if (!Equals(originalEntity.Price, Price))
{
    timelineEvents.AddEvent<BookTimelineEventsEntity>(
        "Price Change",
        $"{Title} Price Changed",
        $"'{Title}' price was changed from ${originalEntity.Price} to ${Price}",
        Id);
}
// % protected region % [Add any further timeline update events here] end
Client-side: Customising Timeline Event Legend (OPTIONAL)
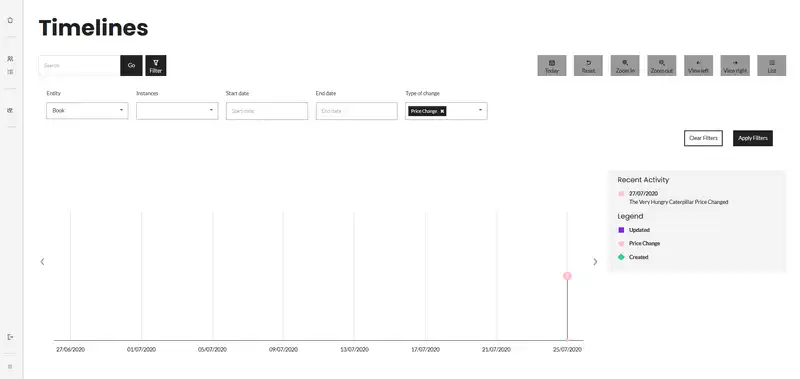
In the Timeline Graph View and Sidebar each Timeline Action has a coloured shape used as part of the legend. By default, custom actions will be displayed with a black box icon. To change this, we need to modify 2 files.
TimelineUtils.tsx
-
Open the file
TimelineUtils.tsxfrom the directory/clientside/src/Util/TimelineUtils.tsx. -
The function
getActionShapeClassNameinTimelineUtils.tsxmaps Actions to css class names. It’s called in the react component that renders the Timeline Graph View and the Sidebar. The default implementation of this function will look like this:// % protected region % [Override getActionShapeClassName here] off begin export const getActionShapeClassName = (action: string) => { switch (action) { case 'Created': return 'diamond'; case 'Updated': return 'square'; case 'Deleted': return 'circle'; default: return 'default'; } }; // % protected region % [Override getActionShapeClassName here] end -
Let’s add a new case for our custom Timeline Event
Price Change. We want to use a pink circle to signify aPrice Change. Turn the protected region on and update the code with our new case:// % protected region % [Override getActionShapeClassName here] on begin export const getActionShapeClassName = (action: string) => { switch (action) { case 'Created': return 'diamond'; case 'Updated': return 'square'; case 'Deleted': return 'circle'; case 'Price Change': return 'pink-circle'; default: return 'default'; } }; // % protected region % [Override getActionShapeClassName here] end
timelines-view.scss
The styling for these css class names is defined in the file timelines-view.scss in clientside/src/scss/admin/behaviours/timelines for the Timeline view in the Admin area of the application, and clientside/src/scss/frontend/behaviours/timelines for Timeline views made through a Timeline Tile in the Interface Diagram.
In this example we will be modifying the Admin Timeline view. Open clientside/src/scss/admin/behaviours/timelines/timelines-view.scss. Update the $admin-color-shapes variable to include our pink-cricle class and a definition for the colour. Also remember to turn the protected region on.
// % protected region % [Add shape definitions here] on begin
$admin-color-shapes: ("pink-circle": #FFC0CB, "diamond" : $admin-color-support-green, "circle" : $admin-color-support-red, "square" : $admin-color-support-purple, "default" : $admin-color-primary);
// % protected region % [Add shape definitions here] end
Next, find the protected region:
// % protected region % [Add additional graph-shape styling here] off begin
    // % protected region % [Add additional graph-shape styling here] end
This protected region allows you to define custom shapes for you action class names on the Timeline graph view. Turn it on and add the following:
// % protected region % [Add additional graph-shape styling here] on begin
@else if $shape==pink-circle {
    .item__amount {
    &:after {
        border-radius: 50%;
        }
    }
}
// % protected region % [Add additional graph-shape styling here] end
The last protected region we need to change defines the shape of the icon in the Sidebar/Legend.
Find the protected region:
// % protected region % [Add additional sidebar-shape styling here] off begin
// % protected region % [Add additional sidebar-shape styling here] end
Turn it on, and add shape styling for pink-circle.
// % protected region % [Add additional sidebar-shape styling here] on begin
@else if $shape==pink-circle {
    &:before {
    border-radius: 50%;
    }

}
// % protected region % [Add additional sidebar-shape styling here] end
Result
Now custom events will be logged for price changes on book entities and they will be displayed with a unique icon in the Timeline view.

Was this article helpful?