How do I run my app?
So you have an app, and now you want to see it! Currently, the are two ways to view your app: running it on your local computer, or How do I view my app?. This article covers running your app locally using Docker.
In order to view your application on your computer, you will need to complete three steps:
- Get the code onto your computer - using Git or a git client,
- Get the program which will run your code - by installing Docker, and
- Start running your app - using Docker and a teensy-bit of code.
The whole process should take less than 30 minutes to setup the first time. Once you have done it, it only takes a few minutes to get a different app running.
If you have any issues with these instructions, please let us know. We are doing our best to make them as accessible as possible, but we can’t get better without your feedback. To get in touch, just use the support link in the menu.
If you are a techie, you probably won’t need to follow these instructions step by step, and you probably have your own preferences for how you want to do things. High level, all you need to do is clone your repo to your machine, have Docker running, then use the shortcut files to start your app. There are some Useful Docker Commands.
Step 1: Getting the code onto your computer
To get the code onto your computer, you will need to use Git to copy it down.
If you are a developer, you will most likely have Git already on your computer, setup according to your personal preferences. If this is the case, you can skip straight to setting up your repos.
What is Git?
Git is how you and the bots can work together side by side. You can use Git to access your source code and edit it, commit your changes, then update the diagrams and get the bots to build again, without losing your progress.
Think of it like a storage space / file system up the cloud which both you and the bots can work with at the same time. Git can help you identify who changed what, when, and help ensure you don’t overwrite each other.
Git helps with this by copying all of the source files down onto your machine. From there you can edit them, upload your changes, or download any new changes the bots have made as needed.
- For more information on the basics of Git, you can look at any number of articles on the web. (We are fond of this one).
- For more information on how the bots work with Git, read Codebots and git (written for techies).
Downloading a Git Client
If you don’t already have Git on your computer, getting a Git client is the first thing you will need to do. There are many different Git clients that you could use to manage Git on your computer. If you are in a tech company or a company with developers, they might have a preference for which one you use. If this is the case, ask them for their recommendations/assistance with this process.
If you have no preferences, then we recommend you use GitFiend. It is freely available on Mac, Windows, and Linux, and has a very simple interface. It suits our purposes quite nicely.
Go to the home page of the GitFiend website and download it for your computer. Run the install like you normally would any other app.
Setting up your repo
Each application you make on the Platform will have its own repository associated with it (meaning that if you have multiple apps, you will need to clone multiple repositories).
If you’re already have your app open:
- Find the orange
Build app vbutton in the top-right corner. - Click on the drop down arrow.
- At the bottom of the drop-down will be a button labelled ‘Open git’.
- Click on that button to open your Git repo in another tab.
If you don’t have your app open:
- Go to your site home page.
- Locate the app you want to view.
- Open the options menu (three dots in the top corner).
- Click on the ‘Open git repo’ option.
The Platform will open up the repo (provided you have access to it), and will use single sign-on to log you in.
If you did not use our recommended Git client, then you will need to rely on documentation or someone else’s assistance for this part.
To clone it to your local machine, follow the below instructions (or skip to the video at the end):
- Choose where on your computer you want the files to be saved, and create a folder to contain your app(s).
For this demonstration, we will be creating a file calledCodebotsin theDocumentsfolder. This will hold all the Codebots apps we want to run. - Open up GitFiend and click the ‘Clone a Repo button’. Alternatively, you can go to the ‘Open…’ button at the top of the app and choosing the ‘Clone Repository’ option.
- The ‘Clone a Repo’ pop-up will display.
- Get your repository URL from the Git repo (instructions to open it above).
- Paste the URL into the ‘URL or path’ field of the popup.
- Click the ‘Browse’ button next to the ‘Where to clone to field’.
- Navigate to the folder you made earlier where you want to save all your apps and click Open.
CodebotsinsideDocumentsin this example. - Click on the ‘Clone’ button.
- It will now ask you for authentication. Your login details will be your Codebots account details, unless you nominated your own Git repo.
- When you are ready, click on the OK button.
- If all went well, your app will begin cloning down to your computer.
This video uses the old Git settings page which no longer exists. To get your git URL, follow the above instructions.
Step 2: Installing the program which runs the code
In order to be able to actually run your application, you will first need to install Docker.
What is Docker?
Docker is how we are able to automate a lot of the app running process, to make it as painless as possible to work with. It means your developers can set up the environment which is required to run the app, packaging it up into a neat little container which comes with the code. All you need to do is tell it when to start and stop.
Unfortunately, the first time you will need to install the program. But once you have done it the first time, it gets significantly quicker.
Downloading & installing Docker
To download Docker, open the Docker Desktop page and click on the blue “Download for X (stable)” button at the top.
Run the file the which you have downloaded and complete the installation process. If you are using Windows, please make sure you read the linked documentation below. There are specific steps which can’t be missed and are not always obvious.
For instructions and installation requirements, you can follow the official Docker documentation:
If your computer does not meet the system requirements you will need to follow a different set of instructions to get your app building locally. See Starting the Prebuild Ubuntu 18.04 Virtual Machine for instructions on setting up a local machine.
If you ever get stuck at any point in the install process, you can refer to the Docker documentation and choose your OS for instructions and specifications. Alternatively, you can reach out to our support team via the feedback portal.
Windows Home
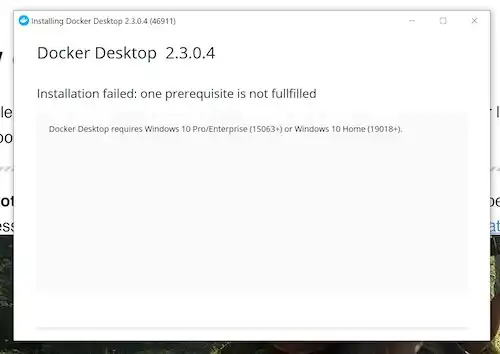
If you are using Windows Home, you need to be on one of the latest versions of Windows in order to be able to install Docker. You can choose to either update Windows before you start, or try the installation and see if it works.
The installation instructions are here: Windows Home instructions
Instructions on checking and updating your Windows version: Updating Windows 10
If during the installation process you see the following error message, that means you will need to update your Windows:
Step 3: Running your app
-
Make sure docker is running
OS Instructions Windows It will show up in your status bar. It doesn’t start automatically after installation, so open it following these instructions. Mac It will show up in the status bar. To start it, open it from your applications folder. - In your file browser, open to the folder that you cloned down earlier. It will be called whatever you chose to name it (i.e. ‘Fishnatics’).
-
And navigate to the
_shortcutsfolder and follow the instructions for using these scripts (depending on your OS):OS Start Instructions Stop Instructions Windows Right click windows_start.ps1, clickrun with powershellto start the app.Right click windows_stop.ps1, clickrun with powershellto stop the app.Mac Double click mac_start.commandto start the appDouble click mac_start.commandto stop the appUbuntu Double click linux_start.shto start the appDouble click linux_stop.shto stop the appThis will cause a new terminal or command prompt window to open up at that selected location which will run docker.
- Wait as it starts up. You will see the logs to let you know when the application when the app is running and ready to go!
Opening your app
Once it is running, you can go to http://localhost:8000 to view your app.
If you were able to run Docker successfully, you will be greeted with a login page. Depending on what user groups you set up in the Diagram, you will need different accounts to get in. There is also a super account which you can use if needed:
Username: super@example.com
Password: password
If you are unable to login despite having the correct access details, your server-side may still be starting up. Give it a few minutes and try again.
Stopping your app
If you want to stop your app running, you can press Ctrl+C (Not Cmd+C, even on a mac) while in the terminal/command window to cancel the current process. Alternatively, you can close that window, or you can kill the Docker application.
Switching to a different app
If you want to run a different app using docker, you will need to repeat the above instructions, minus the download and setup parts.
Since Docker runs based on the repository that is it started in, all you need to do is ensure that you have the files on your computer first.
You will need to stop the other app running before starting another one.
Was this article helpful?