Using Import/Export with Data Table in SpringBot
Please note: Whilst the export feature is available in both C#Bot and SpringBot applications, the import feature is only available for SpringBot applications running version 1.3.0.0 or later. C#Bot applications will be receiving this feature soon.
Import and export are features which allow for the importing and exporting of entities in CSV format. The Import and Export all buttons are visible at all times, and the Export button for specific entities will be visible when entities are selected, in a similar way to how the Delete button is shown.

Export
The export functionality allows you to export entities from the Data table tile in CSV (Comma Separated Values) format. Clicking the button will open a new tab which starts the download of any selected entities. This exported CSV file will contain all of the fields in the entity, including fields not shown in the Data table tile, such as the ID, as well as the user who created or last modified the entity.

Import
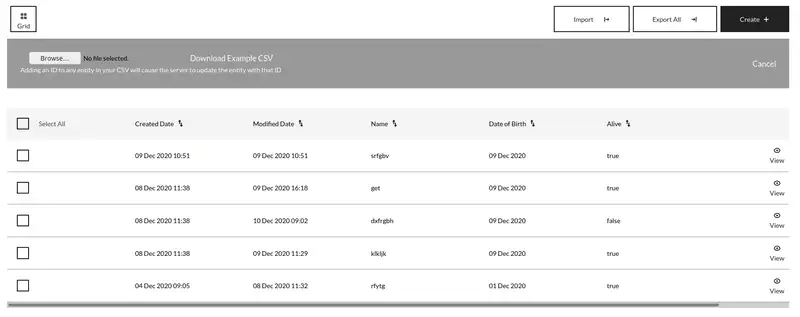
The import functionality allows for importing entities from a CSV file into your database. When you click the import button, the banner showing the delete and export buttons will be replaced with another banner containing buttons relevant to importing CSV files.

From this banner, you can either select a CSV file to import, or download an example CSV which contains all of the headers which can be used in the csv file. The banner also explains the behaviour of the CSV when importing an entity with an ID.
When importing an entity into the Data table tile, if an ID is not given for a particular entity, then the server will create a new entity with the specified details. However, if an entity in your CSV contains an ID, then the server will attempt to update the entity associated with that ID with the new data given in the CSV. As a result of this behaviour, the server will not allow an entity to be imported which contains an ID that is not associated with an entity in the database. The reason for this is that creating an entity with a pre-existing ID is not possible, as the value is set by the database. Similarly, the other fields in the exported CSV which are set by the database (CREATED, CREATED_BY, MODIFIED, MODIFIED_BY) cannot be included in the CSV file. Therefore, if you wanted to export a CSV file, make some changes, and then re-import it into the database, you would need to remove these four columns, as they are written by the database when creating or updating an entity.
Import validation
In addition to the previously discussed validation rule regarding the ID of an entity in the import, there is multiple stages of validation which must all be completed before the entities can be created or updated by the server. The import of entities is also transactional, meaning that all entities in the imported CSV must be valid. If there are issues with any entity then the whole import will be rejected. Any validation issues will return a 403 (Bad Request) status code, along with the line number where the issue was found, and a description of the problem to assist with fixing errors
The first stage of validation which is completed is ensuring that the file exists, that it is not empty, and that is has the ‘.csv’ file extension. If the file is empty or missing, then there is no need to proceed as nothing will happen, whereas files which are not CSVs should not be parsed beyond this, as they are more likely to be malicious in nature.
Following this, the headers in the CSV are validated against the headers which are allowed for the entity. This ensures there are not any headers which should not be present in the CSV, as these headers would be ignored otherwise, and their data would not used in the import. Once this check has been completed, the entities are parsed from the CSV into entities in the server. During this stage, any parsing errors, such as incorrect date formats, or invalid UUIDs are caught and returned to the client-side. During the parsing stage, the permissions of the user performing the action are also checked to ensure they have the relevant permissions to create or update the entity.
Once these steps have been completed, the next check ensures the IDs are passed in with an entity are associated with entities, as was explained before. During this stage the entity is validated to ensure that any constraints on the entity have not been violated. These constraints could be things such as validators, relations, or uniqueness constraints.
Following all of these steps, the entities in your CSV file will be created or updated in your database, and will be shown in the Data table tile. Each of the validation stages detailed in this section have detailed error messages associated with them, which will help to debug any issues which arise when attempting to importing entities.
Was this article helpful?