Multi-Entity CRUD
It is rare for an entity model to map perfectly to the UI model for an application, and it often makes sense for entities to be structured in a way different to how the user will interact with them. To address this, SpringBot applications can be configured to provide multi-entity CRUD.
The purpose of this article it to introduce you to the idea of multi-entity CRUD, show you how to use it and how it works as well as to outline the caveats and limitations of this powerful feature.
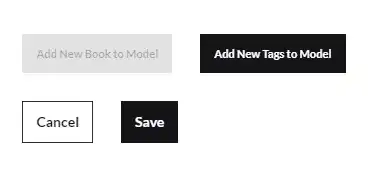
Here you can see an example of this in action; when managing an article we can create/edit the book or the tags associated with it, even though this represents three independent entities.

This article will be uses the Learning Management system example project, using the
Article,TagandBookentities.
Contents
- Getting started
- Explanation
- Caveats
Getting started
The Example below is the best place to get started with learning this new functionality (and may be all you required). For more detail on exactly the functionality works, you can read the rest of this documentation.
Definitions
| Name | Details |
|---|---|
| Parent entity | The entity which is created/edited by default on a given CRUD edit page. In the Example below this will be the Article entity, as we are going to be interacting with the entities on the Article CRUD edit page. The parent entity can often refer the entity that is the source of a reference (the entity that the arrow on the diagram editor points away from in one-to-many references). |
| Related entity | The entity/entities which are being created or edited on a CRUD edit page alongside the parent entity. Please note that multiple entities can be related to a single parent entity, as it is possible to edit more than one additional entity. |
| Relation | A relationship between two entities in your model. Can also be called a reference. |
| Ones Relation | The singular side of a relationship between two entities, where the specified side of the relation will only have one instance of the related entity. Ones Relations include both sides of a ‘One to One’ relation, and the source side of a ‘One to Many’ relation. For example, in the ‘One to Many’ relation between Article and Tag, any references to the Article will be the Ones Relation |
| Many Relation | The side of a relationship between two entities where the specified side of the relation will have multiple instances of the related entity. Many Relations include both sides of a ‘Many to Many’ relation, and the target side of a ‘One to Many’ relation. |
| CRUD edit component | The CRUD edit component is the component responsible for the viewing, editing and creation of entity instances. They are defined in the [EntityName]-crud-edit.component.ts files underneath src/app/components/crud/[EntityName]/edit/. These components represent pages and therefore referring to them as such is valid and correct. |
| Create edit component | The create edit component is the key component that all CRUD edit components leverage to display attributes on the page and allow the user to interact with them. This component is found at clientside/src/app/lib/components/crud/createEdit/crud.create.edit.component.ts. |
Example
In this example, we will be configuring the CRUD edit component for the Article entity (which is defined by the article-crud-edit.component.ts file found at clientside/src/app/components/crud/article/edit/article-crud-edit.component.ts) to allow us to create or edit the associated Tags and Books as shown above.
We will be starting with the Learning Management system SpringBot model, and we will be focusing on the one to many references between the Book entity and the Article entity and the many-to-many reference between the Tag entity and the Article entity.

There are two key changes that we need to make, first on the client-side and second on the server-side.
A video showcasing the process of turning on multi entity CRUD can be found here.
Client-side
-
Open up
article-crud-edit.component.ts(found atclientside/src/app/components/crud/article/edit/article-crud-edit.component.ts) and find the commentFields for implementing multi entity crud. Below this you will see two code blocks with a protected region each.// % protected region % [Modify the display name and the flag for enabling multi entity crud and on relation between Book and Articles here] on begin bookMultiCrudActive = true; bookDisplayName = 'Book'; // % protected region % [Modify the display name and the flag for enabling multi entity crud and on relation between Book and Articles here] end bookOppositeRelation = 'articles'; bookRelations: ModelRelation[] = BookModel.getRelations().map(relation => { if (relation.id === this.bookOppositeRelation) { relation.hideElement = true; } return this.prepareSingleReferenceCollection(relation); }); // % protected region % [Modify the display name and the flag for enabling multi entity crud and on relation between Articles and Tags here] on begin tagsMultiCrudActive: boolean = true; tagsDisplayName = 'Tags'; tagsCollectionId: string = uuid.v4(); // % protected region % [Modify the display name and the flag for enabling multi entity crud and on relation between Articles and Tags here] end tagsOppositeRelation = 'articles'; tagsRelations: ModelRelation[] = TagModel.getRelations().map(relation => { if (relation.id === this.tagsOppositeRelation) { relation.hideElement = true; } return this.prepareSingleReferenceCollection(relation); }); -
Activate the protected region for each of these and update the
multiCrudActivevariables to be set totrue.// % protected region % [Modify the display name and the flag for enabling multi entity crud and on relation between Book and Articles here] on begin bookMultiCrudActive = true; ... clientside/src/app/lib/components/crud/createEdit/crud.create.edit.component.ts // % protected region % [Modify the display name and the flag for enabling multi entity crud and on relation between Articles and Tags here] on begin tagsMultiCrudActive: boolean = true; ...
You have now activated these fields for the Article entity. Your create/edit/view screen for the article should now have your additional fields grouped together (similar to below).

Server-side
Given that you now have your additional fields available on your client-side, you may have noticed that these new attributes from your reference entities do not persist when you click save.
To enable the server-side functionality, we need to make a small change to our Article entity.
-
Open up
ArticleEntity.java(found atserverside/src/main/java/[projectName]/entities/) and find your reference class attributes for your Tags and Book.// % protected region % [Update the annotation for Tags here] off begin @Schema(description = "The Tag entities that are related to this entity.") @ManyToMany(cascade = {CascadeType.MERGE}, fetch = FetchType.LAZY) @CsvIgnore // % protected region % [Update the annotation for Tags here] end private Set<TagEntity> tags = new HashSet<>(); ... // % protected region % [Update the annotation for Book here] off begin @Schema(description = "The Book entities that are related to this entity.") @ManyToOne(cascade = {}, fetch = FetchType.LAZY) @CsvIgnore // % protected region % [Update the annotation for Book here] end private BookEntity book; -
Activate these protected regions and update your cascade types. We need to add
CascadeType.PERSISTto allow children to be saved with ourArticleentity.// % protected region % [Update the annotation for Tags here] on begin @Schema(description = "The Tag entities that are related to this entity.") @ManyToMany(cascade = {CascadeType.MERGE, CascadeType.PERSIST}, fetch = FetchType.LAZY) @CsvIgnore // % protected region % [Update the annotation for Tags here] end private Set<TagEntity> tags = new HashSet<>(); ... // % protected region % [Update the annotation for Book here] on begin @Schema(description = "The Book entities that are related to this entity.") @ManyToOne(cascade = {CascadeType.PERSIST}, fetch = FetchType.LAZY) @CsvIgnore // % protected region % [Update the annotation for Book here] end private BookEntity book;
Your new fields are now operational and you can create linked Tags or a linked Book when you create or update your Article entity.
A video showing this functionality being used and the expected result can be found here.
Explanation
This section will aim to explain how the multi-entity CRUD feature works, and the code which makes it possible. As this is a large and complex feature which was designed to be a fully formed solution, we have not added any additional protected regions to the implementation where they are not necessary, and we do not recommend making changes to any of the methods or logic which were used to implement this feature. If you discover any issues with the functionality, or would like to request a change or feature, then please let us know on the Codebots Forum.
Client-side
Displaying attributes of entities in CRUD Edit components
Before we can discuss how additional entities can be added to the CRUD edit pages, we need to talk about how attributes for a single entity are displayed on the page. The implementation of multi-entity CRUD builds upon the default implementation, making it difficult to understand without an understanding of how CRUD edit pages work normally.
Model properties and relations
Every entity added to the client-side of your application has two static methods called getProps() and getRelations(). These methods each return a list of ModelProperty and ModelRelation objects respectively, and contain all the information required for the create edit component to render the inputs on the page.
An example of one of these methods can be found here:
static getProps(): ModelProperty[] {
	return super.getProps().concat([
		{
			name: 'name',
			// % protected region % [Set displayName for Name here] off begin
			displayName: 'Name',
			// % protected region % [Set displayName for Name here] end
			type: ModelPropertyType.STRING,
			// % protected region % [Set display element type for Name here] off begin
			elementType: ElementType.INPUT,
			// % protected region % [Set display element type for Name here] end
			// % protected region % [Set isSensitive for Name here] off begin
			isSensitive: false,
			// % protected region % [Set isSensitive for Name here] end
			// % protected region % [Set readonly for Name here] off begin
			readOnly: false,
			// % protected region % [Set readonly for Name here] end
			validators: [
				// % protected region % [Add other validators for Name here] off begin
				// % protected region % [Add other validators for Name here] end
			],
			// % protected region % [Add any additional model attribute properties for Name here] off begin
			// % protected region % [Add any additional model attribute properties for Name here] end
		},
		// % protected region % [Add any additional class field names here] off begin
		// % protected region % [Add any additional class field names here] end
	]);
}
The output of the getProps() and getRelations() methods is stored in the modelProperties and modelRelations attributes of the CRUD edit components. These attributes are passed as inputs to the create edit component, where they are then used to display the HTML inputs for the attributes in the entity.
Grouping
The ModelProperty and ModelRelation objects have an optional field called group. This field will not be added to any attributes by default, but you can add a group attribute to any entity in order to group them in a way which is more logical for your use case. Any attributes which contain a group with a shared id will be grouped together.
export interface Group {
	id: string;
	displayName: string;
	model?: any;
	form?: FormGroup;
	manyRelation?: boolean;
}
If attributes from within the same entity are being grouped, then only the ID and the display name are required, however if we are using multi-entity CRUD, we will be using groups that contain all of the optional fields as well. The purpose of these attributes is explained below in Populating Model Properties and Relations. Groups will then be split up and rendered differently in the Create/Edit page by running the separateForm method, which is run on initialisation of the Create/Edit page.
Multi-Entity CRUD client-side implementation
The code which makes multi-entity CRUD possible is contained within various crud-edit components and the crud-create-edit component, which is a child of the crud-edit components. For this example we are examining the Article crud-edit component, which can be found at clientside/src/app/components/crud/article/edit/article-crud-edit.component.ts. In the Article CRUD component, under the Fields for implementing multi entity crud comment, there are some attributes defined for each relation. These will be used to configure the multi-entity CRUD functionality. These attributes and their purpose are discussed here:
// % protected region % [Modify the display name and the flag for enabling multi entity crud and on relation between Articles and Tags here] on begin
tagsMultiCrudActive: boolean = true; // Whether multi-entity CRUD is activated for this relation
tagsDisplayName = 'Tags'; // The display name for the relation. Used for the labels in the entity list in the create edit component
tagsCollectionId: string = uuid.v4(); // The collection ID for storing related entities when fetching from the server. Only needed for many relations
// % protected region % [Modify the display name and the flag for enabling multi entity crud and on relation between Articles and Tags here] end
tagsOppositeRelation = 'articles'; // The name of the other side of the relation. Used to hide the appropriate relation from the list of attributes in the create edit page
tagsRelations: ModelRelation[] = TagModel.getRelations().map(relation => { // The default relations for the entity being expanded. A copy of this is added whenever we add an additional entity to the create edit page
    if (relation.id === this.tagsOppositeRelation) {
    relation.hideElement = true;
    }
    return this.prepareSingleReferenceCollection(relation);
});
Multi-entity CRUD requires multiple steps to be executed during the initialisation process for the CRUD Edit component. These steps, their purpose, and examples of the code required to implement them, can be found in the following sections.
Initialising additional entity collections
The method initialiseMultiEntityCollections() will be called during ngOnInit() and is the first step in initialising multi-entity CRUD. This method will initialise collections for any activated many relations, as we need to be able to fetch and display a list of entities. Later in the process we can use these collections to fetch entities from the server so that they can be displayed on the create edit page and are available to be edited by the user. Relations which require a collection will also implement a subscription in this method. The code inside the subscription will be run whenever the entities contained in the collection are updated. Seeing as our collection is currently empty, this code will not run until we execute an action which populates the collection.
initialiseMultiEntityCollections() {

    ...

	if (this.tagsMultiCrudActive) {
    	this.defaultMultiEntityButtons.push({name: this.tagsDisplayName, many: true});
    	this.store.dispatch(new tagModelAction.TagAction(
    		tagModelAction.TagModelActionTypes.INITIALISE_TAG_COLLECTION_STATE,
   			{
    		collectionId: this.tagsCollectionId
    		},
        ));

        this.creationNavigationSubscription$.add(this.store.select(getTagCollectionModels, this.tagsCollectionId).subscribe(models => {
			models.forEach(tags => {
				let updatedProps = getNewModelProperties(
					createReactiveFormFromModel(TagModel.getProps(), this.tagsRelations, this.isViewOnly),
					tags,
					TagModel,
					this.tagsDisplayName,
					this.modelProperties,
					this.modelRelations,
					this.tagsRelations,
					true
				);
				this.modelProperties = updatedProps.modelProperties;
				this.modelRelations = updatedProps.modelRelations;
			});
		}));
    }

	...
}
At this point we also add an option to the defaultMultiEntityButtons array. This array determines the buttons which will be shown on the create edit page for adding additional entities to the page. The many attribute which we pass in also determines whether the button should be disabled if an entity has already been added, as we would expect for the ones side of a relation.
Fetching related entities
In normal operation of the CRUD edit page, relations only need to have an ID and a name so that they can be added to the drop-down for that relation and selected as a related entity. However, when operating in multi-entity mode this is not enough and it is necessary to fetch all of the entities which are related to the parent entity at the time of initialisation. Therefore, the purpose of this step is to fetch any entities which are already associated with the parent entity for relations which are operating in multi-entity mode. We then add those entities to the form in the create edit page so that they can be viewed and updated.
This logic is handled in the method multiCrudFetchAdditionalEntities(), which will be called as part of the fetchEntity() method during initialisation. You may have also noticed that due to calling this step in fetchEntity(), this step will only be executed if we are viewing or editing an existing parent entity. When entities are created, they will not have any associated entities yet and due to this step being the way that we fetch previously existing entities, this step is not necessary during the creation of the parent entity.
Each of the relations which have been activated in multi-entity CRUD mode will first dispatch an action which is created using the multiCrudExtraEntityAction() method. This method takes a lot of inputs (You can look at the logic for multiCrudExtraEntityAction() in model-utils.ts if you are interested), but the output will be an action which has been built based on the inputs.
- If the relation is for a single entity (such as the
Bookrelation on theArticleentity) then this method would return an instance of aFETCH_BOOKaction, as this action is used to search for a single entity based on it’s ID. - If the relation is for multiple entities (such as the
Tagrelation on theArticleentity) then this method will return an instance of theFETCH_TAG_WITH_QUERYaction, as this action allows us to search for a list of entities based on the value of one of its attributes.
multiCrudFetchAdditionalEntities() {
	if (this.targetModel.book && this.targetModel.book.id && this.bookMultiCrudActive) {
		this.store.dispatch(multiCrudExtraEntityAction(
			BookModel,
			this.bookOppositeRelation,
			this.collectionId,
			1,
			this.targetModel.book.id,
			false
		));

		this.creationNavigationSubscription$.add(this.store.select(getBookModelWithId, this.targetModel.bookId).subscribe(book => {
			let updatedProps = getNewModelProperties(
				createReactiveFormFromModel(BookModel.getProps(), this.bookRelations, this.isViewOnly),
				book,
				BookModel,
				this.bookDisplayName,
				this.modelProperties,
				this.modelRelations,
				this.bookRelations,
				true
			);
			this.modelProperties = updatedProps.modelProperties;
			this.modelRelations = updatedProps.modelRelations;
		}));
	}

	if (this.targetModel.tagsIds && this.targetModel.tagsIds.length > 0 && this.tagsMultiCrudActive) {
		this.store.dispatch(multiCrudExtraEntityAction(
			TagModel,
			this.tagsOppositeRelation,
			this.tagsCollectionId,
			this.targetModel.tagsIds.length,
			this.targetModel.id,
			true
		));
	}
}
Populating model properties and relations
Once the entity action has been dispatched, the subscriptions for the different related entities will trigger getNewModelProperties, which will add the new entity to the Create Edit component. This is done by adding additional objects to the modelProperties and modelRelations arrays.
Using the group interface which was discussed in the Grouping section, we can create ModelProperty objects which the Create edit component will recognize are not part of the parent entity. This is done by adding the optional attributes to the group when it is created:
// Group needs to be identical for all elements which are meant to be in a group, as the method which processes the group will process
// the first instance of a group with this groups ID, so any differences in subsequent groups with the same id will be ignored
group = {
	// This method will be run multiple times through the change detection cycle when initialising for many relations.
	// We need to be able to check for duplicate groups so it is necessary that a model input produces an identical group on different runs
	id: model.id ? groupDisplayName.toLowerCase() + '_' + model.id : groupDisplayName.toLowerCase() + '_' + uuid.v4(),
	displayName: groupDisplayName,
	model: model,
	form: form,
	manyRelation: manyRelation,
};
group.form.patchValue(model);
For both properties and relations, we can add that group to the default properties for the related entity type we are adding, and add that property (with its associated group) to the modelProperties and modelRelations arrays respectively. That way, when those lists are passed into the create edit component, the different entities will each be recognized as belonging to different groups, which will lead to them being displayed separately.
Modifying the entities in the Create Edit form
When buttons are activated (add or remove), an event is run from the onMultiEntityAction method in the Create Edit page. This event triggers a change in the onMultiEntityAction method inside of the CRUD edit page.
This method has two cases:
Removing an reference entity from the view
If groupId is present in the event, then any properties and relations which have a group with the specified ID will be removed from the modelProperties and modelRelations arrays. As these arrays are inputs to the create edit component, changing them like this will cause the component to be re-rendered, which will remove the specified entity from the component.
Adding a reference entity from the view
If groupId is not present, then we will attempt to add a new entity to the model props and relations. Just like when we remove an entity, changing the variables in the CRUD edit component will trigger a re-render of the Create Edit component. Adding an entity also relies on the entityName attribute, which will be passed in through the event. Once we have determined which entity the user wants to add, we can add the properties and relations for a new entity. The code used to add the new entity is the same as the snippet used in the subscriptions for adding existing entities; the only difference is that we are passing in a new model of the specified type, instead of an existing entity.
// This will add a new entity of the specified type to the list of props/relations
if (event.entityName === this.bookDisplayName) {
	let updatedProps = getNewModelProperties(
		createReactiveFormFromModel(BookModel.getProps(), this.bookRelations, this.isViewOnly),
		new BookModel(),
		BookModel,
		this.bookDisplayName,
		this.modelProperties,
		this.modelRelations,
		this.bookRelations,
		true
	);
	this.modelProperties = updatedProps.modelProperties;
	this.modelRelations = updatedProps.modelRelations;
}

...
Sending related entities to the server-side
In the CRUD Edit page we get the entities from the form in the populateAdditionalEntities method. This method returns a unique data structure for each entity type in the application. This data structure will contain any related entities which could potentially be present due to multi-entity CRUD.
These are piped into the event emitter within the onSaveClicked and the onCreateClicked methods as additionalEntities. These additional entities are combined into the target model if multi-CRUD is active for that relation. This functionality is implemented in the CRUD edit component inside of the addAdditionalEntitiesToModel method.
This target model is then persisted to the server as normal.
Server-side
There are three key locations in the server-side that have been updated to allow for multi-entity CRUD.
Entity reference attributes
We have updated our reference attribute annotations to allow our EntityManager operations to be propagated to our references. This is how we achieve save our child entities when we save our parent entity.
The annotations in question are the JPA CascadeTypes. For our use case, we use only the MERGE and the PERSIST so as to propagate create and update operations but not delete operations.
For example:
@ManyToMany(cascade = {CascadeType.MERGE, CascadeType.PERSIST}, fetch = FetchType.LAZY)
private Set<TagEntity> tags = new HashSet<>();
We have opted to take a conservative approach on cascading to maximise data integrity and minimise dangerous bugs. Hence why we have chosen to use only
MERGEandPERSISToperations.
It is important to set the correct persistence to avoid confusing errors later on.
Entity service
The updateOldData method found within each entity’s CRUD service has been updated to support a new parameter: persistRelations. This new parameter is used to allow for the cascade operations defined in our entity to be realised.
public ArticleEntity updateOldData(ArticleEntity entity, Boolean persistRelations) { ... }
The update to the updateOldData method is the most complex change to the server-side. Based on a number of conditions it will calculate whether the child entity should be created, updated, or the reference removed.
Using the below table as a reference, we can determine how the updateOldData will manage different inputs.
| Create | Update | Change reference | Delete Reference | |
|---|---|---|---|---|
persistRelations | ✔ | ✔ | ? (No impact) | ? (No impact) |
| Materialised reference exists | ✔ | ✔ | ❌ | ❌ |
| Transient reference exists | ❌ | ✔ | ✔ (See example for details) | ❌ |
| Materialised reference ID exists | ❌ | ✔ | ✔ (See example for details) | ❌ |
To understand the above table, you need to look at the object structure. For example, we can break it down looking at the Article entity payload below.
{
	"article": {
		"id": "4ff88061-6b55-4521-840a-32bd04946c80",
		"created": "2021-05-24T05:17:03.713Z",
		"modified": "2021-05-31T07:46:11.333Z",
		"title": "Rerum iste enim accu",
		"summary": "Sint sit illo aliq",
		"content": "Et eos delectus sed",
		"book": {
			"created": "2021-05-31T07:46:05.685Z",
			"modified": "2021-05-31T07:46:05.685Z",
			"name": "Rooney Odonnell",
			"summary": "Maiores adipisicing ",
			"articlesIds": []
		},
		"tags": [
			{
				"created": "2021-05-31T07:46:08.784Z",
				"modified": "2021-05-31T07:46:08.784Z",
				"name": "Nichole Wiley",
				"articlesIds": []
			}
		]
	}
}
Materialised reference
The object above contains two materialised references.
Book
"book": {
    "created": "2021-05-31T07:46:05.685Z",
    "modified": "2021-05-31T07:46:05.685Z",
    "name": "Rooney Odonnell",
    "summary": "Maiores adipisicing ",
    "articlesIds": []
}
Tags
"tags": [
    {
        "created": "2021-05-31T07:46:08.784Z",
        "modified": "2021-05-31T07:46:08.784Z",
        "name": "Nichole Wiley",
        "articlesIds": []
    }
]
These are considered materialised as they contain the full object.
Transient reference
A reference can also be defined based on the ID only.
If we were to refer to our Book entity and Tag entity references transiently it would appear as follows:
"bookId": "7d60018f-163d-432c-b700-38ee4e246fb4",
"tagsIds": [
    "6b14bca2-e349-44ea-974d-7e52dec882f6"
]
The referenced object must already exist to be able to be transiently referenced.
Examples
Now that we understand the difference between materialised and transient references let us look at some examples.
Creating
For this example, persistRelations=true and we will create an associated book.
{
	"article": {
		"id": "4ff88061-6b55-4521-840a-32bd04946c80",
		"created": "2021-05-24T05:17:03.713Z",
		"modified": "2021-05-31T07:46:11.333Z",
		"title": "Rerum iste enim accu",
		"summary": "Sint sit illo aliq",
		"content": "Et eos delectus sed",
		"book": {
			"created": "2021-05-31T07:46:05.685Z",
			"modified": "2021-05-31T07:46:05.685Z",
			"name": "Rooney Odonnell",
			"summary": "Maiores adipisicing ",
			"articlesIds": []
		}
	}
}
- Our materialised book does not have an ID
- We do not have transient references
-
persistRelations=true.
Updating
For this example, persistRelations=true and we will update an associated book.
{
	"article": {
		"id": "4ff88061-6b55-4521-840a-32bd04946c80",
		"created": "2021-05-24T05:17:03.713Z",
		"modified": "2021-05-31T07:46:11.333Z",
		"title": "Rerum iste enim accu",
		"summary": "Sint sit illo aliq",
		"content": "Et eos delectus sed",
        "bookId": "7d60018f-163d-432c-b700-38ee4e246fb4",
		"book": {
            "id": "7d60018f-163d-432c-b700-38ee4e246fb4",
			"created": "2021-05-31T07:46:05.685Z",
			"modified": "2021-05-31T07:46:05.685Z",
			"name": "Rooney Odonnell",
			"summary": "Maiores adipisicing ",
			"articlesIds": []
		}
	}
}
- Our materialised book has an ID
- We have an transient reference to the book and it has the same value as the materialised Book ID.
-
persistRelations=true.
Changing reference
For this example, we will swapping the book for another one.
{
	"article": {
		"id": "4ff88061-6b55-4521-840a-32bd04946c80",
		"created": "2021-05-24T05:17:03.713Z",
		"modified": "2021-05-31T07:46:11.333Z",
		"title": "Rerum iste enim accu",
		"summary": "Sint sit illo aliq",
		"content": "Et eos delectus sed",
        "bookId": "7d60018f-163d-432c-b700-38ee4e246fb4"
	}
}
- No materialised book
- New transient ID
NOTE: If you wish to update and change in the same step, you must ensure the ID of your materialised reference represents the object you wish to link with as it takes precedence over your transient reference.
Removing a reference
Removing is similar to changing a reference. Unsetting the reference will remove it.
{
	"article": {
		"id": "4ff88061-6b55-4521-840a-32bd04946c80",
		"created": "2021-05-24T05:17:03.713Z",
		"modified": "2021-05-31T07:46:11.333Z",
		"title": "Rerum iste enim accu",
		"summary": "Sint sit illo aliq",
		"content": "Et eos delectus sed",
        "bookId": ""
	}
}
NOTE: The materialised references will take precedence over the transient ones, so in the case of a conflict, the transient reference will be overridden with the materialised one.
NOTE: Only the information pertaining to the relationship between the two entities has been removed. The
Bookentity still exists, but is unlinked.
Mutation resolver
The mutation resolver is where the GraphQL input is interpreted and managed before it is passed off to the service.
When persisting nested objects, the resolver handles a specific case that we do not see in our example diagram. Let’s say we changed our model to appear as follows:

We have a reference tree like the following:
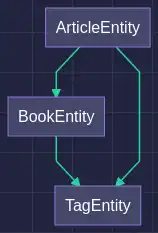
We need to be able to persist the transient references between the Book entity and the Tag entity, which is now two levels deep. This is achieved by utilising the updateOldData method for each of the child entities.
For example:
if (rawEntity.getBook() != null) {
    rawEntity.setBook(bookService.updateOldData(rawEntity.getBook()));
}

Set<TagEntity> tags = new HashSet<>();
rawEntity.getTags().forEach(entity -> {
    tags.add(tagService.updateOldData(entity));
});
This transformed object is then sent onto the service to deal with.
NOTE: Second level references are only persisted as transient references, not materialised. This feature only supports first level materialised references.
Caveats
The multi-entity CRUD feature is powerful but does come with some limitations.
-
Security - Enabling a multi-entity CRUD does not update security rules. To ensure that it works, you will need to have a permissive enough security model. For example, if a user cannot update
Tags, they will not be able to save theArticleentity with new or updatedTags. -
Audit Logs - The History feature does not support references at this stage, and any related entities persisted with the parent will not be displayed.


Was this article helpful?