C#Bot IDE Setup - Visual Studio Code (Mac, Windows and Linux)
This guide will walk you through the process of setting up and using Visual Studio Code to work with a C#Bot application.
Required Articles
- Setting Up Your Development Environment
- Running C#Bot.
- Running C#Bot
Setup VS Code
- Download and install the latest version of visual studio code for your OS from the Visual Studio website, and install according to the setup instructions.
-
Once the installation completes, open VS Code and install the following plugins by pressing
Ctrl+P(orCmd+Pon Mac) to open the command palette and copying and pasting the following install commands in, one by one.- C# for Visual Studio Code -
ext install ms-vscode.csharp - Debugger for Chrome
ext install msjsdiag.debugger-for-chrome

- C# for Visual Studio Code -
-
Reload your VS Code instance by pressing
Ctrl+Shift+Por (orCmd+Shift+Pon mac) and searching forReload Window
Source Code
We assumed that by this point you have cloned your project somewhere on your file system.
-
Use
Ctrl+o(orCmd+oon Mac) and Navigate to the root of your project before clicking ok.
-
Save it as a workspace.
Ctrl+Shift+p(orCmd+Shift+pon Mac) to open the command palette and type “Workspace: Save Workspace as…” and select the item that matches
-
Enter your workspace name i.e.
example_app.

Launching and debugging
- Setup your launch.json file.
- Click on the debug icon on the left hand side of the screen.

- Select the debug dropdown menu at the top of the screen.
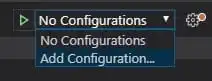
- Select ‘Add Configuration…’
- Choose
.Net Core. - Choose your project from the dropdown menu at the top of the screen.

- Click on the debug icon on the left hand side of the screen.
- Launch your application.
- Click on the debug icon on the left hand side of the screen.

- Select the green arrow at the top of the screen to start debugging.

- Click on the debug icon on the left hand side of the screen.
-
You can now place break points and debug as usual

Was this article helpful?